

In this exercise you will be investigating the potential difference (i. e. voltage) that exists between two pieces of metal when each is placed in a solution containing one of its ions. In this exercise each group will be assigned one of six metal/ion pairs to investigate. The metals and ions to be investigated are Al/Al 3+ , Cu/Cu 2+ , Ni/Ni 2+ , Pb/Pb 2+ , Fe/Fe 3+ and Zn/Zn 2+ . You will first examine the effect of concentration by changing the concentration of metal ion solution outside the porous cup and derive an empirical equation that describes this effect. You will then investigate the effect of addition of OH – to the metal ion solution outside the cup. Finally, you will investigate what happens when you have one metal and its salt coupled to a different metal and its salt with all of the salt solutions at the same concentration.
Figure 1. Schematic of the experimental apparatus used in this exercise.
The experimental set-up, shown schematically in Fig. 1, consists of a metal electrode immersed in a 0.100 M solution of one of its salts inside a porous porcelain cup. This is the cell’s reference compartment. The other metal electrode is immersed in a solution of one of its salts. This is the measurement compartment. The concentration of the salt solution in the measurement compartment does not need to be 0.100 M in the metal ion of interest, but the total salt concentration must be at a relatively high level to be able to make a measurement. So, another, inert salt is added as a supporting electrolyte to facilitate the measurement. In this experiment, we will use KNO3 as the supporting electrolyte. For most of this exercise the two electrodes will be of the same metal, but they are not required to be.
Experimental
For this exercise, you will be working with your benchmates in a group of four. One person will check out from the Stockroom two electrodes, a porcelain cup, and four 100 mL beakers for the bench. Be sure to record the metal (i. e., the electrode material) that you are assigned and the salt that you will use in your laboratory notebook. It is important that the salt’s cation be the same element as the electrode. Otherwise, your data will be meaningless.
CAUTION! All of the metals used in this exercise and their salts are toxic (especially Pb) and care must be taken when handling them. You are advised to wear gloves when handling the electrodes, the solutions and the porcelain cups. Remove your glovesbefore handling the digital voltmeter or before using a computer to prevent cross contamination. Be frugal in your use of the metal ion solutions; they are expensive both in terms of their procurement cost and their disposal cost . You should not need more than about 60 mL of the 0.100 M solution, and even less of the concentrated solution, for the entire exercise.
Remove the two electrodes from their protective bag. Take care with the electrodes, some of the metals are very soft (Pb) and some of the electrodes may be very thin (Cu, Ni). Add approximately 80 mL of 0.1 M HCl to one of the 100 mL beakers. Dip the electrodes in the solution and gently swish them around. It is not necessary to leave them in the solution very long (some will react with the acid). We only want to remove any oxide coating or other contaminants on the surface. Rinse the electrodes with a copious amount of distilled water and pat try with a paper towel.
Lightly buff the surface of the electrodes with a piece of fine steel wool. This will remove the outer layer of metal oxide that coats most metals and any contaminants on the surface, which can interfere with the potential measurements. Do not buff so hard that you remove large amounts of metal. Again rinse the electrode with distilled water and pat the surface dry with a paper towel to remove any metal or metal oxide dust.
There will be a digital voltmeter (DVM) on your bench, like that shown in Fig. 2. Be sure that the red and black leads of the DVM are attached as shown in Fig. 2. To make a voltage measurement, turn the large rotary switch on the DVM to the right to reach the direct current voltage position (). When you have finished making a measurement turn the DVM rotary switch back to OFF (turn left only).
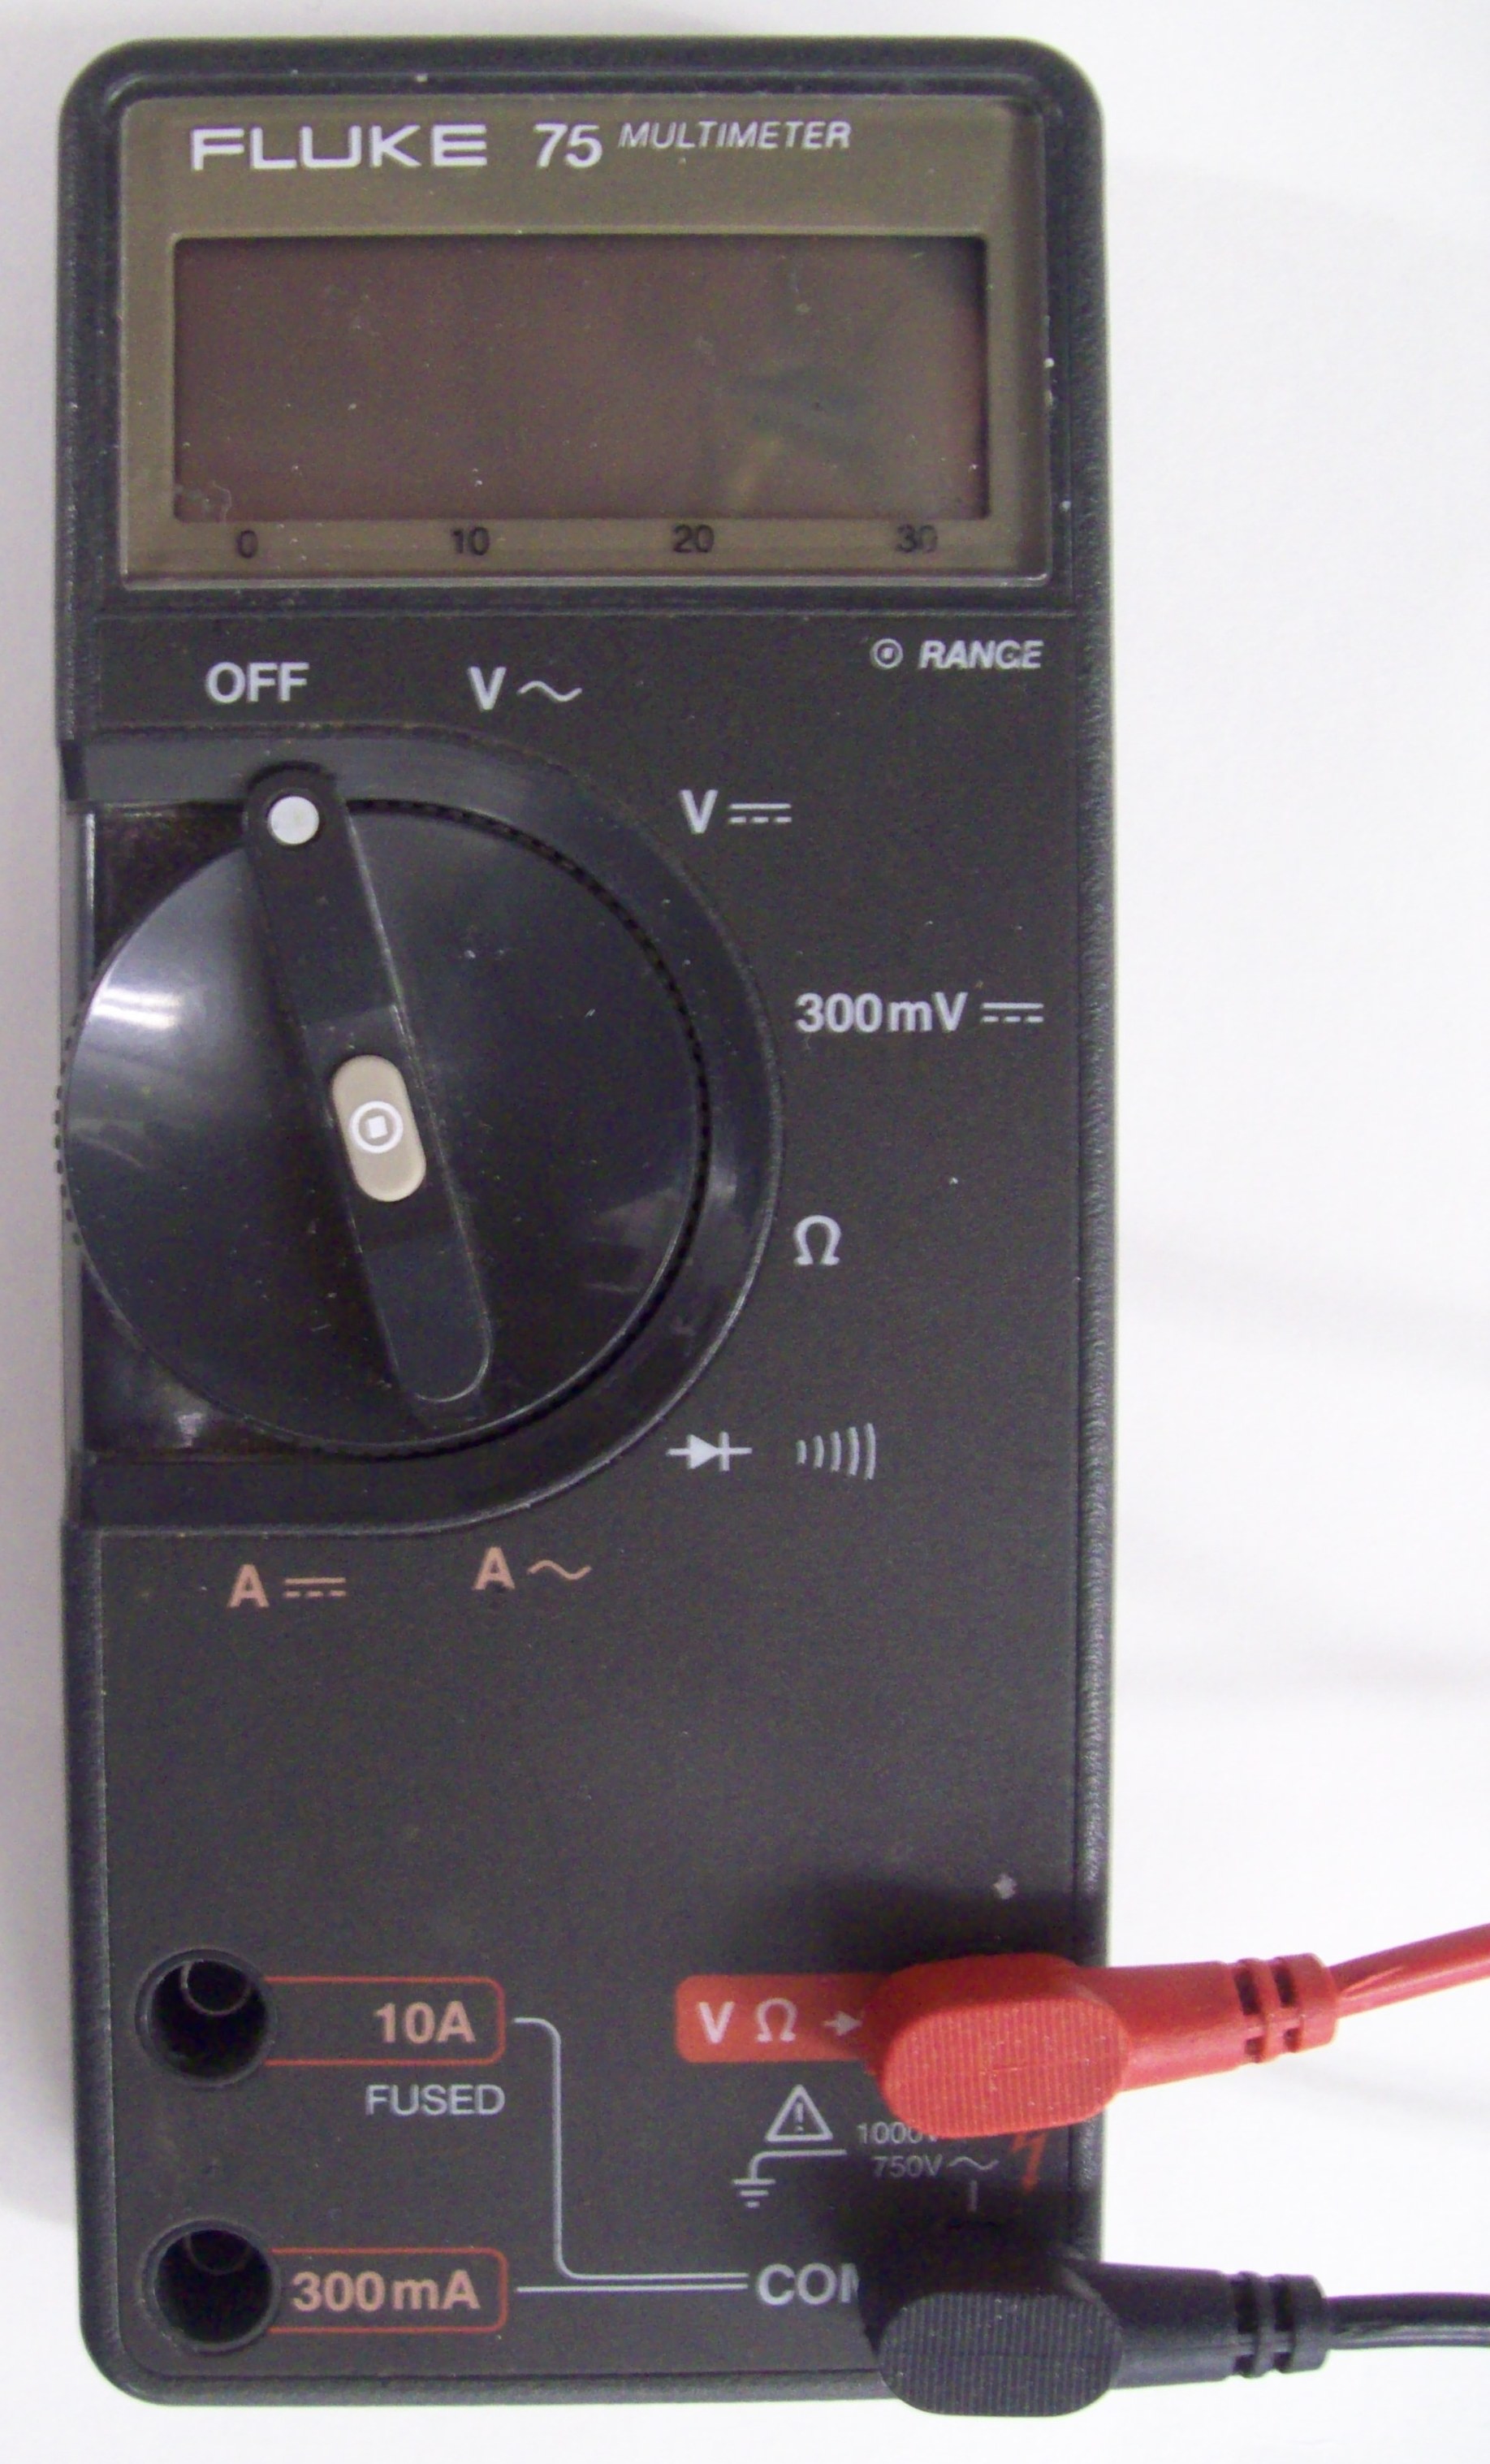
Figure 2. The Fluke 75 digital voltmeter used in this exercise to measure the potential.
Solution Preparation
A 0.10 M solution and a concentrated solution of each metal salt will be provided. The concentrated solution will be between 0.20 and 0.50 M, depending on the salt’s solubility. Be sure to record the actual concentration of the salt in the concentrated solution in your notebook and adjust your dilutions accordingly. Both of these solutions also contain KNO3 so that the total concentration of the ions in the solution is 1.0 M, because it is important to maintain a high salt concentration when performing electrochemistry. Therefore when you perform the dilutions described below, you must use the provided 1.0 M KNO3 solution and not plain water.
Between you and your bench mates, you will have six 100-mL beakers (if you don’t, your instructor will advise you on how to proceed, although just washing a beaker after you have made a measurement is a simple and efficient option). Label the beakers as follows (assuming your most concentrated solution is 0.50 M; if your most concentrated solution is not 0.50 M, you will need to substitute your actual concentrations for the last two solutions): 0.0040 M, 0.010 M, 0.050 M, 0.10 M, 0.25 M and 0.50 M. Pour 50 mL of the 0.10 M solution into the beaker labeled 0.10 M and 50 mL of your 0.50 M solution (or whatever its concentration is) into its beaker. The other solutions you will prepare by dilution from either the 0.10 M solution (i. e., the 0.004 M, 0.010 M and 0.050 M solutions) or from the 0.50 M solution (i. e., the 0.25 M solution) using your 10-mL and 40-mL graduated cylinders to prepare 50 mL of each of the new solutions. We will assume that the solution volumes are additive and so mixing 10 mL of the 0.10 M solution with 40 mL of the 1 M KNO3 solution would give 50 mL of a 0.020 M solution.IMPORTANT! You MUST use the 1 M KNO3 solution when preparing these dilutions, otherwise your results will be meaningless! Helpful hint: you can help keep down lab costs by waiting to make the 0.25 M solution until after you have made your measurement on the 0.50 M solution. In this way you can use the 0.50 M solution to make the more dilute solution and not waste valuable reagents.
It may be helpful to use a table, such as Table 1, below to organize your results, where you will replace the actual salt solution concentrations with the suggested values given in Table 1. Be sure to calculate the exact concentration that you used based on the volumes that you actually used. For example, if you took 9.9 mL of the 0.10 M solution and diluted it with 42.0 mL of 1 M KNO3, the actual concentration that you would have would be 0.019 M, not 0.020 M.
| Concentration (M) | Potential (V) |
|---|---|
| 0.0040 | |
| 0.010 | |
| 0.050 | |
| 0.1 | |
| 0.25 | |
| 0.50 |
Table 1. Suggested table for organizing the potential as a function of concentration data in the laboratory notebook.
If time permits, and your instructor allows it, you can prepare and test other concentrations between 0.001 M and 0.5 M.
Cell Set-Up
Place approximately 10 – 15 mL of the 0.1 M salt solution that matches the metal that you have been assigned in the porcelain cup. The porcelain cups are labeled for each metal; be sure to only use the cup labeled for your metal and do not mix the cups up. IMPORTANT! Take care handling the porcelain cups; they are fragile and expensive! You want the level of the solution in the porcelain cup to be at about the same level as the solution in the beaker when you place the porcelain cup into the solutions you just prepared. This does not have to be exactly the same, but a disparity in liquid levels may cause a systematic error in your results.
Place one of the metal electrodes into the cup; this is your reference compartment. Place your reference compartment in a beaker ( not one of the 100-mL beakers) until you are ready to use it. Be aware that the cup is porous and so the solution will drain out if it is left sitting around for any length of time.
Investigation of Concentration’s Effect on Potential
Assemble the cell as shown in Fig. 3 using the 100 mL beaker containing your 0.10 M salt solution. An iron ring is used to keep the beaker from moving during the measurement (a large three-pronged clamp would work as well), and a clamp is used to position the DVM leads so that the metal electrodes and the metal parts of the leads are not touching each other during the measurement. Note that you should not actually clamp the leads! Rather, use the clamp to position the electrodes in the proper location.
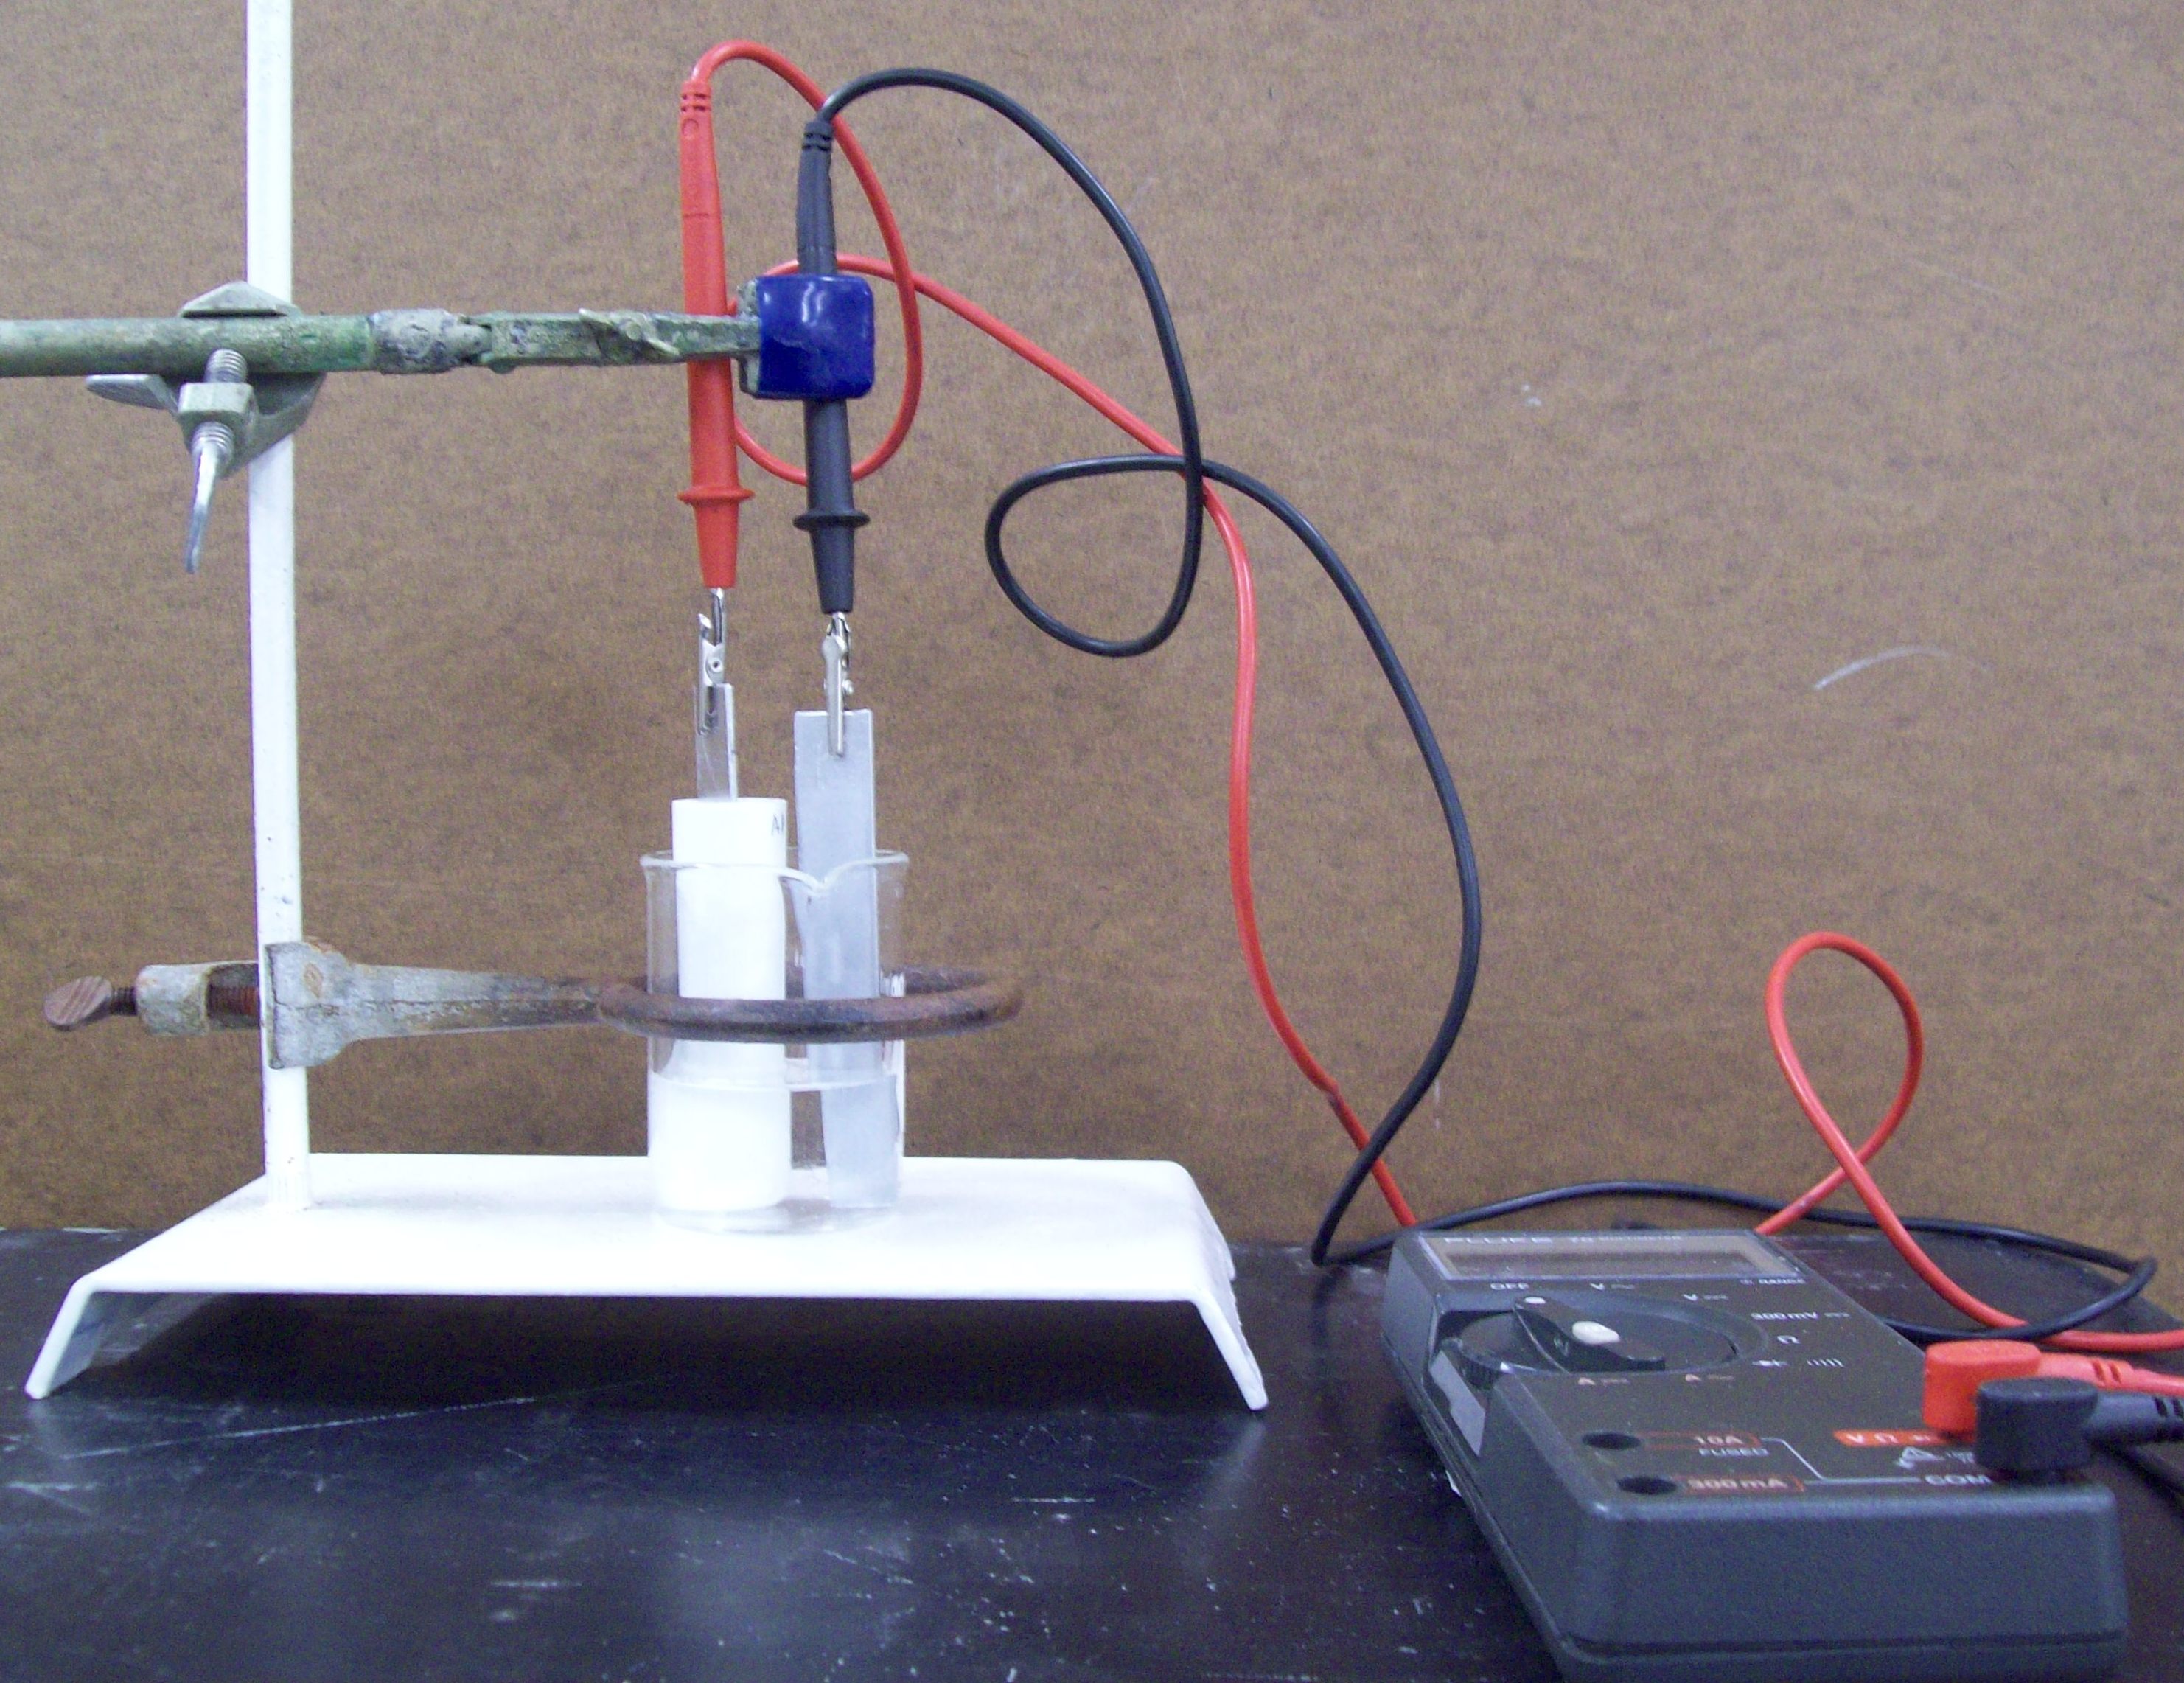
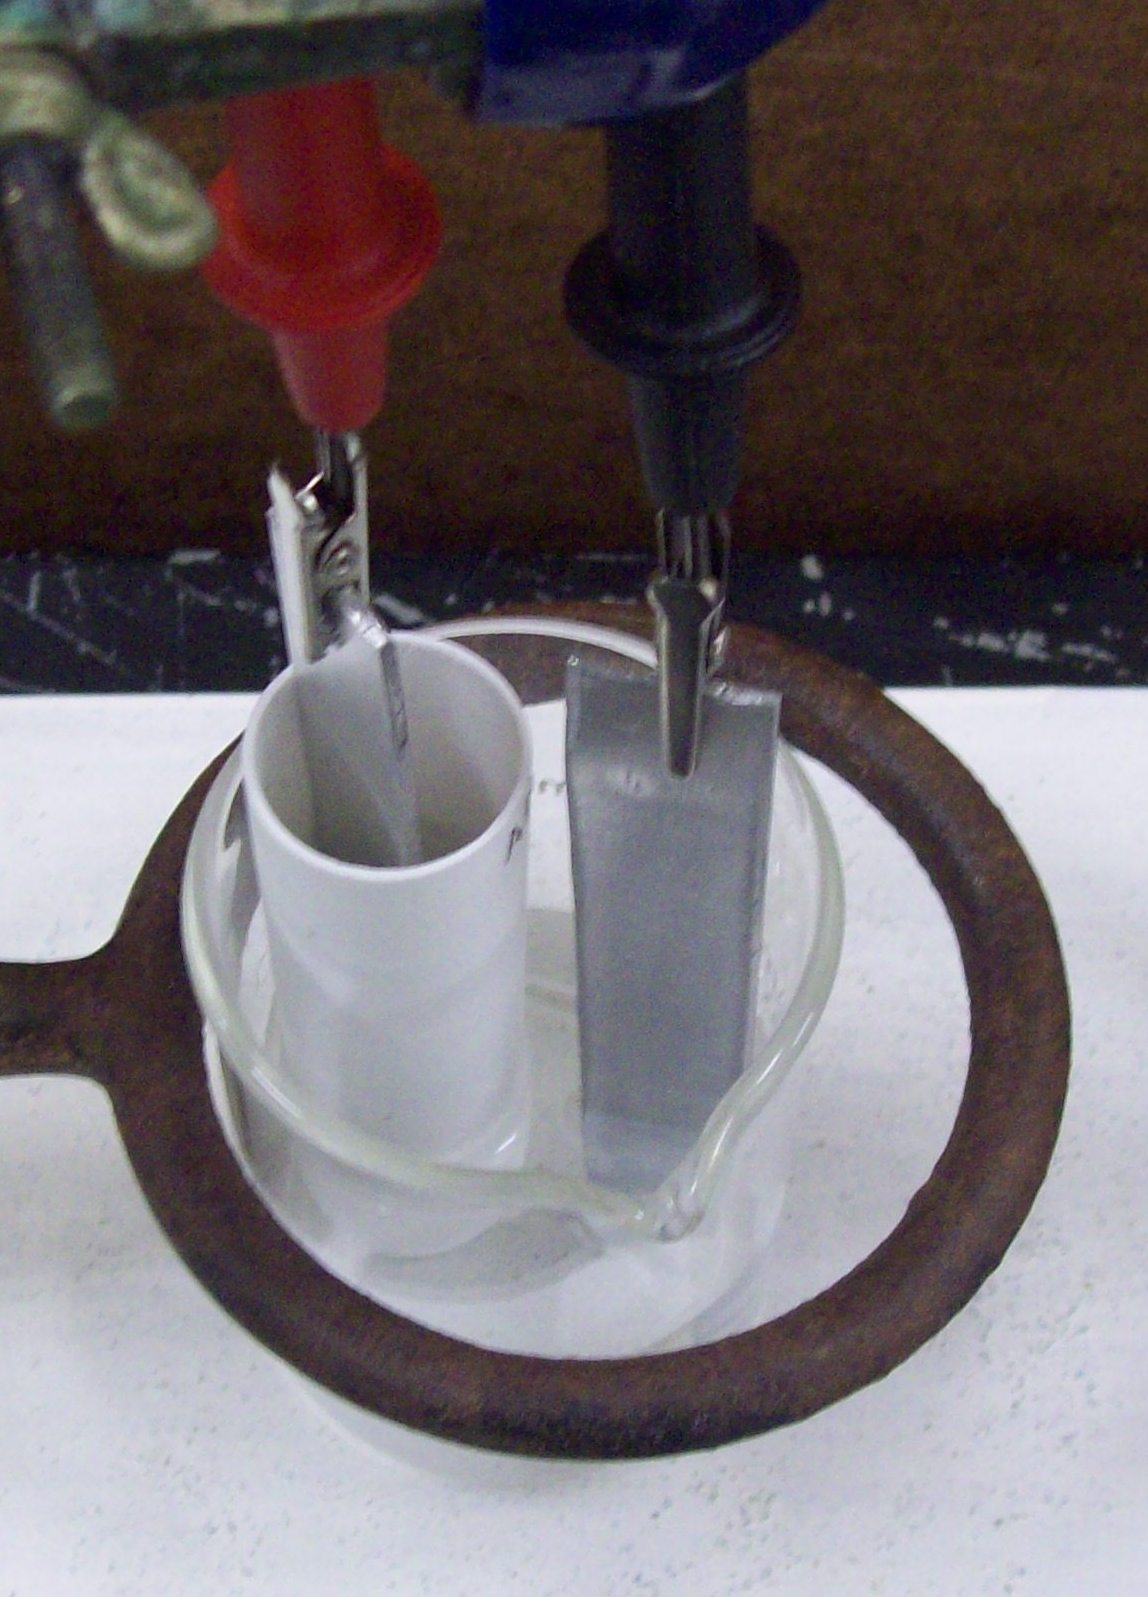
Figure 3. The electrochemical cell used in this exercise: the complete set-up is shown on the left and a close-up of the cell showing the reference compartment (a metal electrode immersed in a 0.100 M salt solution of that metal contained in a porous porcelain cup) and the measurement compartment (the beaker with a metal electrode immersed in a solution containing a salt of that metal).
Carefully attach the DVM leads to the electrodes so that the red lead is attached to the electrode in the reference compartment (the porcelain cup) and the black lead is attached to the other electrode. It is critical that the red lead always be attached to the electrode in the reference compartment and that the electrode and the porcelain cup of the reference compartment do not touch each other. Once you are assured that everything is set up properly, measure the voltage. It may take up to 30 sec for the voltmeter to give a stable reading and you may need to gently stir the outer solution by carefully using the electrode as a stirrer. Record the concentration and voltage reading in your notebook.
Once you have obtained a measurement, shut off the voltmeter and remove the reference compartment and carefully blot away any solution adhering to the outside of the cup with a paper towel. Place the reference in its storage beaker. Remove the second electrode from the cell, rinse with a small amount of distilled water and pat dry with a Kim-Wipe or a paper towel.
Now remove the beaker containing the 0.10 M solution and replace it with the beaker containing the 0.050 M solution. Place the reference compartment and the second electrode into the beaker and attach the leads (be sure that the red DVM lead is attached to the reference compartment’s electrode). Follow the procedure given above to measure the potential for the cell with this solution in the outer compartment, and then repeat for the more dilute solutions and finally for the more concentrated solutions.
What happens to the measured potential as the concentration is lowered? What happens when the concentration in the outer compartment is greater than the concentration in the reference compartment? Compare your results with other groups; do they see the same thing?
Investigation into the Effect of Adding OH –
To the beaker containing the 0.10 M salt solution, add 5.0 mL of 1.0 M of the provided strong base (either KOH or NaOH) using your 10-mL graduated cylinder and mix well. What do you observe when the base was added?
After a couple of minutes, measure the potential between this solution and your reference compartment. What do you conclude about the concentration of your metal ion in the solution to which you added the base?
What happens both to the solution and the potential when a second 5.0-mL aliquot of base is added? What about a third 5.0-mL aliquot?
Investigation into the Effect of the Metal on Potential
In this section you will work with each of the other groups. Your instructor will designate up to three groups to prepare the cell for this portion of the exercise. Each of these groups will place their reference cell in a 100 mL beaker containing 50 mL 1 M KNO3. Other groups will place their reference electrode into the beaker to make the measurement and then change to another cell. Groups will continue to rotate until every possible combination of the electrodes has been measured (see Table 2). When moving a reference compartment, do so in a beaker and use extreme caution. If you are careful, every group should be able to test its electrode with every other electrode, and use no more than 150 mL of the 1 M KNO3.
You can use Table 2 as a way to organize your data for these measurements. The Xs in the table indicate measurements that you do not need to make, either because you made them already (e. g., red probe on a Cu electrode in a 0.10 M Cu 2+ solution and the black probe on a Cu electrode in a 0.10 M Cu 2+ solution) or because they are related to another measurement in the table (you can try a few to see what this relationship is). Be sure to include the sign on the potential (some may be negative!).
| Black Probe on | Cu | Pb | Ni | Fe | Al | Zn |
|---|---|---|---|---|---|---|
| Red Probe on Cu | X | |||||
| Red Probe on Pb | X | X | ||||
| Red Probe on Ni | X | X | X | |||
| Red Probe on Fe | X | X | X | X | ||
| Red Probe on Al | X | X | X | X | X | |
| Red Probe on Zn | X | X | X | X | x | X |
Table 2. Summary table for the effect of the metals in an electrochemical cell have on the potential.
Clean-Up
Place the metal-containing solutions that you used in the measurements in the appropriate waste bottle that your instructor will show you.
Rinse the electrodes with distilled water and dry with a paper towel or Kimwipe before returning them to the storage package. The porcelain cups should be rinsed with distilled water and the exterior should be gently patted dry with a paper towel.
Return all checked-out materials to the Stockroom.
Results and Analysis
Find a method of graphing the potential as a function of concentration that gives a straight line (helpful hint: you might try graphing potential as a function of a power of the concentration, or as a function of an exponential of the concentration, or as a function of the logarithm of the concentration, or as a function of concentration divided by the concentration in the reference compartment). Be sure to follow the guidelines described on the Preparing Graphs page when you prepare these graphs. Note that there may be deviations from linearity at the very lowest and very highest concentrations.
Determine the slope and intercept of your line and compare it to the other groups. Are the slopes and intercepts the same for all of the groups (remember each group is working with a different metal)? Is there any evidence for a junction potential (i. e., a potential that can result when two solutions are in contact with each other)? Think about how a junction potential would affect the measured potential and where it would be the most evident on your graph. Do any differences in the slope suggest that is additional information that could be extracted from the data? How might you use a graph to extract this information?
Can you use your potential data from when OH – was added to a solution of your metal to determine the Ksp of the metal hydroxide? If so, determine it and estimate its uncertainty. If not, what additional information, if any, would you need? Share your results with other groups and compare.
From your data where you compared the different metals, the potential (and its sign) depends on which metals are paired in the electrochemical cell. Rank the metals in an order that reflects your results and compare it to the table of standard reduction potentials found in most general chemistry texts. FYI: it is the convention in electrochemistry to define the direction of spontaneous change ( D G < 0) as having a positive cell potential.
Conclusions
This experiment is a measurement exercise and your discussion should address the points contained in this outline, as well as the questions raised in the Results and Analysis section above.
1. Click here to download this file in PDF format. Note that hyperlinks are not active in the pdf version.